Welcome to (The Occasional) Photo Tip of the Day! Please also visit my main site jeffwignall.com. Text and photographs Copyright 2016 Jeff Wignall.


“The best way out is always through.”


Saturday, January 31, 2009

Find Funny Signs

For some reason signs always seem to catch my eye when I'm traveling--but then again, I guess that's why people put up signs. Duh! What really catches my eye though are the funny signs. Some signs, like the one for a "new, safe heat treatment" that I found (in English, oddly enough) in Paris is meant to be funny. Paris had had a long, hot summer and the whole country was suffering serious heat problems. This ice cream vendor decided that he had the secret treatment for all of that heat: eat more ice cream (I couldn't agree more).

Other signs are unintentionally funny--like conflicting one-way signs that don't allow you to drive in either direction, or a "Watch Your Step" sign inadvertently posted near the edge of the Grand Canyon. In any case, the key to finding funny sign photos is just to read lots of signs and, of course, having your camera with you!

Friday, January 30, 2009

Silhouette Subjects Indoors

Taking silhouettes is a fun way to create simple bold compositions and though most silhouettes are created outdoors against the sky, you can also create them indoors. I've shot many silhouettes of my cat, for example, sitting on the windowsill watching birds at the feeder. All I do is frame the cat and expose for the light outside.

You can also create some clever silhouettes in other indoor situations. I photographed this mother and child in front of a huge aquarium window at the Mystic Aquarium, for instance, just by hanging back and watching them as they waited for something interesting (a penguin in this case) to swim past. I shot several frames of them just standing there, but then the mother pointed at a penguin and I knew the gesture would make a more interesting shot.

The secret of a good silhouette is having a bright or colorful background (preferably both) and exposing for the background. Exposure isn't critical and you can always saturate the black shapes and the colors later in editing.

Thursday, January 29, 2009

Explore Your House

The past few weeks in New England have been bitterly cold and there's a ton of snow and ice around. On these days I rarely go out to photograph (fresh fluffy snow is great, but this frozen slush is the visual pits), but I still have the urge to take pictures. One thing I've taken to doing is just prowling around the house with my camera looking for interesting little vignettes--like these two colored bottles sitting in a front window (the slats are partially opened blinds).

You'll be surprised what interesting finds you can make, especially in windows. One night during an ice storm my neighbors left their porch lights on all night and they were illuminating a frozen window in my living room. I set up a tripod and shot several long exposures and two of those photos ended up in my book The Joy of Digital Photography. I've also learned that having a few good houseplants in flower during the winter helps me keep my macro skills well honed.

Wednesday, January 28, 2009

Hang Out Near Harbors


If you find yourself getting a little bit bored photographically and you're looking for something new and different to photograph, take a drive to the nearest harbor. I happen to live near Long Island Sound so there are lots of nearby harbors and I find them extremely interesting. The small harbors, like the one on the Housatonic River near my house, has a lot of local fisherman, small sailboats and a thriving oyster industry. It's a relatively quiet harbor, but there is almost always something interesting to shoot and I should probably pay the river a royalty considering all the photos that I've shot there and had published.

When I'm feeling really restless though, I head up the road to New Haven harbor. New Haven is a fairly busy city harbor and has a lot of huge freighter traffic. The freighters are surprisingly easy to get a shot of too: either as they transit in and out of the harbor or tied up to a mooring as they offload their cargo. It helps if you have a long lens when you're shooting ships because often the best views are from the opposite side of the harbor or from the shore as they pass by. If you can get out onto a breakwater you can often get very close shots with a much wider lens. I've shot from docks at a few industrial harbors and had captains wave at me as they cruise by--exciting stuff!

Incidentally, keep an eye on tidal charts if you want to get ships coming and going because, obviously, this is something they only do at high tide. You might also contact the harbormaster's office and ask them if there is a shipping schedule available. And always keep an eye out for tugs on the move since most harbors require a harbor pilot to go aboard and control the ship as it enters or leaves a commercial harbor. Odds are if you see a tug heading in or out (a good shot all by itself) there is a freighter about to arrive or depart.

Tuesday, January 27, 2009

Warm Things Up with Photoshop Photo Filters

Back in the film days I used to load my camera bag with expensive (and heavy) glass filters for various photo effects: cooling, warming, soft focus, etc. It was just a normal part of my shooting routine to decide which filter to use for a given scene. These days, while I still carry a polarizing filter and a few neutral density filters, I do most of my warming and cooling in Photoshop.

The fastest way to add warmth (or cooling) to a file in Photoshop is using the "photo filter" option that you'll find in the pop-up menu at the bottom of the layers palette. Once the toolbox opens you'll find 20 preset filters (warm, cooling, blue, yellow, emerald green, etc.) and a second box that you can click to create a custom filter from virtually any color that you want. Using the presets is simple: just pull down the menu, highlight the filter you want to try and select it. If you don't like the look, just slide the menu back down and try again with another filter. In the photo of the gardens at Chateau de Chenonceau (in the Loire Valley of France), for example, I used the #85b warming filter option. To use the custom-color filters, just click that box and then double click the color patch and the entire spectrum opens up. Select the color you want and you'll see the changes immediately in the image.

There is also a "density" slider so that you can adjust the intensity of the color you're adding. I tend to work at about 20-25% density when I'm adding warmth of cooling, but it really depends on the image and the effect I'm after. It's all very simple and fast and while I generally prefer to create balances using more controllable tools (like the selective color tool), the photo filters are great for a quick fix. Remember that, as with most Photoshop filters, you can also make a selection first and just add the filtering to the selected area--very useful for warming up a red barn, for example, or cooling a blue sky.

I have to admit that while I have romantic memories of choosing just the right color filter when I was out in the field shooting, and took some sort of silly pride in my collection of expensive glass filters, I really don't miss them. Those lens filters are expensive, delicate and heavy--and they also degraded sharpness. Viva la Photoshop!

Monday, January 26, 2009

Include Signs for Useful Information

When I was prepping the photo of the main conservatory at Longwood Gardens (outside of Philadelphia) for yesterday's post, I came across this waterlily shot also taken at Longwood. It reminded me of a good tip: always shoot a few spare shots that include signs to help you identify objects and places. I'm usually too busy and too impatient to write down things like plant names or street names, so I pop off a few quick frames to help me identify things later.

While metadata is good at telling you how, when and (with GPS) roughly where you shot a photo, it won't tell you what kind of lily you were shooting or the name of the restaurant where you shot a photo of the salad bar. Signs are just as useful in identifying photos after a shoot as they are in guiding you through life and they are a lot more convenient than a notepad!

Sunday, January 25, 2009

Bring a Monopod Where Tripods Aren't Allowed

Given a choice, I will always choose to shoot with a tripod. However, there are many public places, like cathedrals and public gardens (like Longwood Gardens, main conservatory shown here), where tripods are simply not allowed. In those cases I almost always bring a monopod to steady the camera. A monopod is essentially a one-legged tripod (your two legs provide the other legs of a tripod) and while not as steady as a tripod, they can help you shoot at much slower shutter speeds than you would normally shoot handheld (even with vibration reduction).

A good monopod (I have a Bogen/Manfrotto) will cost you under $100 and you can add a small ballhead with a quick release for about another $100. Every time I use my monopod I bless the day I started using them. Not only do they steady the camera nicely, but they support the weight of longer lenses (taking the weight off my shoulders) and let me stand "at ease" without the weight of the camera strap pulling on my neck--this adds hours to my shooting stamina.

When it comes to choosing your monopod, put some weight (camera weight and your body weight) on it to be sure it won't slip in use. I have monopods that are 20 years old, so try not to cheap out; years from now you'll be glad you spent the extra few dollars for a top-quality monopod.

Saturday, January 24, 2009

Add a Gaussian Blur to Soften Details

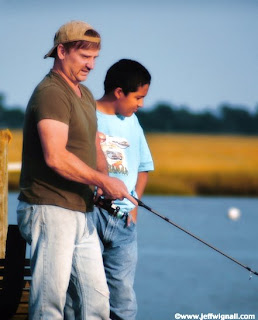
Most of the time I try to make my photos as sharp as possible and go to considerable pains to be sure that they are sharp. Occasionally though I like to intentionally soften an image just to give it a somewhat romantic and gentler look. In the photo of two men fishing, for example, I liked the sharp version, but experimented with a blur filter and ended up liking the new look.

If you're editing in Photoshop the simplest way to soften an image is to use the Gaussian Blur filter.

Using Gaussian Blur is very simple: you just apply it to the image and adjust the degree of softness that you want. But there is a more sophisticated way to control the balance between sharpness and blur:

1. Call up the original image and do all of your color and exposure corrections.

2. Using "Command J" (Mac; Option J in Windows), duplicate that layer.

3. Go to the filters menu and apply the Gaussian Blur to the duplicate layer.

4. Go to the "Opacity" slider (top right of the layers panel) and adjust the opacity of the blur layer until you get just the degree of softness you're after. The opacity slider lets you reveal the original image and blend it with the soft image according to the degree of opacity you're using. At 100% opacity, none of the original sharp image is showing through. At 50% opacity, the image is an even mix of soft and sharp files. In this case the opacity was around 40%, meaning that the image was a mix of 60% sharp and 40% blur layers.

5. Optionally, experiment with some of the "Layer Blending Modes" (top left of the layers panel) and see if a different blending mode produces an effect you like more.

6. Save the file with layers open in case you want to play with the image again later, then using a different file name, save a flattened version.

The use of a duplicate layer allows you to bring up some of the sharpness from the original image layer and have much more control over the degree of blur in the final image. In fact, I often use duplicate layers for adjustments so that I can blend them more precisely with original image.

Friday, January 23, 2009

Be a Landscape Minimalist

Landscape photos, by their very nature, often require including somewhat complex visual elements. If you're photographing an interesting pattern of ripples in a sandbar at the edge of the sea, for instance, and also want to include the surf, a few palm trees and some interesting clouds, you've got to find a way to organize those elements to strike a good and non-competitive visual balance. But sometimes the best way to organize them is to simply reduce, drastically, the number of visual elements.

Over the years I've tried to play a little mental game when I'm composing a landscape by challenging myself to reduce the number of graphic elements necessary to tell the story. I've shot lots of sunsets over the desert in Arizona, for instance, and they usually include a lot of elements: saguaro cactus, the sun, rock cliffs, a path, etc. The day I shot this photo though I was struck by how far down I could distill the elements and still capture the scene before me. I ended up just using two bold ingredients: a black silhouette of mountain and a colorful sky. What else did I need? This is exactly what sunset feels like to me in Arizona, so why clutter it up?

You may not always be able to reduce a landscape to two elements, but the more you whittle down and refine the primary ingredients, the more powerful each of them becomes. Again, by doing that with this scene, I've established a fierce contrast of earth and sky.

Thursday, January 22, 2009

Take Some Snapshots Just for Fun

A lot of times those of us who take photography seriously tend to take is so seriously we forget about taking "snaps" just for fun. I don't mean semi-serious photos, I mean just silly old snapshots. There's some kind of mental barrier in many photographers' brains that prevents us from taking "bad" photos. Lose that mental barrier!

Taking total snapshots is not only fun, but (especially when you're traveling) it can also be a good way to free your creative spirit. If you say, "I don't care what this looks like, I just want a memory of this place at this moment," then you find yourself shooting pictures that genuinely convey that spontaneous feeling of just being somewhere new. No f/stops to think about, no depth of field, no lens choice, just snapshot fever.

The photo here, for example, was shot while I sat on the fender of a rental car in an inn parking lot in the Loire Valley of central France. I was just sitting there watching the traffic roll by and decided I wanted a visual reminder of what the road looked like since I'd driven down it a few dozen times. I have lots of really "serious" photos that I've taken in France, but I get a pretty big kick out of looking back at that familiar road. The strange thing is, this is the only photo I have of that road and the farm where I was staying was one of my favorite places in France. It's not Paris, not a medieval castle, just a country road in the middle (literally) of France.

Personally I don't think snapshots get the artistic respect they deserve: they are perhaps the most honest of all the photos we take and have no pretense, no high ambitions, no technical correctness, just a quick look at a moment in our lives. So take some snappers--they are tons of fun to look at and come with zero angst!

Wednesday, January 21, 2009

Beware Specular Highlights

Taking accurate light readings is very important in getting good exposures, whether you're metering in a manual mode or your automatic meter is doing the work for you. Metering scenes of average brightness, where nothing is radically darker or brighter than the majority of tones in the scene, is fairly simple and most built-in meters do a very good job.

Problems arise when there is excessive contrast in a scene, because the dynamic range (the dark-to-light contrast range) extends beyond the camera's ability to record those tones. One type of contrast situation that all cameras have a tough time with is what's called a specular highlight. These are extremely bright spots in a scene, created by a direct reflection of the sun or some other light source (like flash reflecting in a mirror), and they cause the meter to grossly underexpose (i.e. give too little exposure) an image because they make the meter think that the entire scene is brighter than it is.

There's really no safe way to meter with a specular highlight other than to exclude it from your composition during the metering phase. In the shot here, for example, I wanted the reflection of the sun in the water, but I knew that if I metered with that spot in the frame, the whole scene would have been drastically underexposed. Instead, I took a reading from the boat and the water (which already constituted a fairly contrasty scene) while carefully excluding the bright spot in the water. Then I simply locked in that reading by holding the shutter-release button halfway down and recomposed the scene.

Beware any very bright pockets, especially around reflective surfaces, and you'll get much more consistent exposure results.

Tuesday, January 20, 2009

Dream a Beautiful American Dream


"...As I went walking I saw a sign there
And on the sign it said 'No Trespassing.'
But on the other side it didn't say nothing,
That side was made for you and me."

from "This Land is Your Land"
Woody Guthrie

Monday, January 19, 2009

Spotlight Subjects with Front Lighting

There's a funny shift in the value (or lack thereof) of front lighting in still photos that's taken place during the years that I've been writing photo books. When I first started writing about photography the general rule was "keep the sun over your shoulder," which meant in essence, always use front lighting. Then as consumers became more hip to the value of different lighting directions in "creative" photography, front lighting somehow got shoved to the back of the lighting bus.

Early on, I was as guilty as anyone in describing light that fell on the front of a scene as mostly a utilitarian lighting direction for getting a good exposure and keeping pesky shadows at bay (hidden behind subjects). Today though, partly because our audience has grown more sophisticated, most photo teachers and writers acknowledge that any light is good light if it works with the subject you're shooting. In fact, since many digital cameras produce somewhat flat and unsaturated colors, the use of front lighting is actually a great way to put some snap into ordinary outdoor scenes.

And let's face it, sometimes you're stuck with the light that you're stuck with and unless you want to linger your vacation away waiting for the earth to spin a bit more, you play the cards your dealt. In the case of this antique-sign display in Greenville, Maine, front lighting (also slightly from above) was not only the only option (unless I wanted to wait a few hours for the signs to fall into shade) but the spotlighting effect really ignited the colors and added a nice crisp sharpness to the scene. While I normally saturate most digital images at least a tiny bit (especially for the web), this shot is exactly as it came out of my Nikon D70.

So if your dad always told you to keep the sun over your shoulder, he was actually giving you pretty good advice. Unless, of course, backlighting or sidelighting works better for a particular shot!

Sunday, January 18, 2009

Wait for Still Waters

Here's a quick tip that I use a lot in my own work: If you're shooting a small harbor on a breezy day, wait until just before the sunset begins and you'll notice that the surface of the water gets a lot smoother--creating pretty reflections and streaks of color. As the sun sets, breezes tend to die down and that creates that pretty calendar-look sheen to the water.

I can actually see the moment happen sometimes when the water is a bit choppy one minute and then glassy smooth the next. I really prefer that smooth, slippery look to the water's surface and I love the reflections that it creates. I shot this scene in Stonington, Maine just after the sun hit the horizon but before the actual sunset had begun. The colors are still fairly neutral at this time so you get a natural-looking scene that has an almost soft-focus sheen to it. A few minutes after this frame was shot, of course, the sun had set and the colors began to warm significantly--creating a whole new dynamic.

Saturday, January 17, 2009

Meter from a Middle Tone

You probably know this already, but all light meters are designed to give accurate readings only when metering a subject of average tone. This is often referred to as "middle gray" because an average tone sits in the middle of a tonal gray scale halfway between pure white and pure black. If you're not reading from a middle tone, your light readings can never be accurate--unless you make exposure adjustments (using "exposure compensation," for example) based on personal experience.

It's far simpler to find an area within your scene that is of a middle or "average" tonality. Fortunately these things are quite prevalent--green foliage, green grass, blue sky, most gray objects--are close enough to middle gray in tone to provide very accurate metering results. This is particularly useful when a scene contains a lot of very bright subject matter (like the snow in this scene) or very dark areas (big shadow areas or a dark-colored building, for example) because these dark or light areas will fool the meter. But if you meter from the neutral/average tonal area, the light or dark areas where fall exactly where they belong.

Careful metering is important and it's why your camera probably has a center-weighted metering mode--so that you can choose what to meter precisely. In that mode your meter is concentrating almost all of its metering attention on a small area in the center of the frame (indicated in your viewfinder by a circle in the center). And once you've metered the best area, simply use your meter-lock feature (holding the shutter-release button down halfway) to lock that reading and your exposures will be perfect. For more on the theory and practical uses of light metering, be sure to see my latest book Exposure Photo Workshop--hopefully your local library has a copy so you can borrow it for free.

Friday, January 16, 2009

Plan a Desert Flower Trip

For some reason the desert is always described as an arid and lifeless environment. In reality though, nothing could be farther from the truth. In late winter and early spring, for instance, the deserts of Arizona and New Mexico are just exploding with beautiful displays of wildflowers and cactus blossoms.

Just how great the flower displays are in any given year depends largely on how wet the winter was: the more water the desert gets in winter, the better the flower displays. Timing is also crucially important and often just a few days can mean the difference between a spectacular display and one that's much less exciting. Late March and early April seem to be particularly good in southern Arizona (around the Tucson area), but again, it really depends on weather. There are a lot of online sources that update desert flower conditions on a day-to-day basis, so the best thing to do (especially if your travel plans are flexible) is to keep on eye on those sites and then try to guestimate when the peak time will occur.

One good place to start your research is the Desert USA site where you'll find up-to-date info on flowering conditions in Arizona, California, Nevada, New Mexico and Texas. There's no place quite as beautiful or as mysterious as the desert when it's in flower, so it's absolutely worth the effort it takes to get there!

Thursday, January 15, 2009

Take Names & Numbers

One thing that I'm terribly remiss about doing when it comes to photographing people that I don't know is getting their names and addresses so that I can send them prints later. It's not that I photograph strangers a lot, but occasionally I stumble onto a shot and it turns out nice and then I realize I can't share it with the subjects.

The photo here is a great example. I saw these kids (all members of the same family, I think) posing for a photograph on the statue of Alice in Central Park. It looked like a great photo opportunity for me, too, so I popped off a few frames. But before I could search in my bag and find a pen and a business card, the family had disappeared. I'm sure they got their own shot, of course, but I think this angle from the side makes a nice shot and I know the parents would have liked it.

So next time you're out in a park shooting and you happen to grab a good-looking shot of strangers, just politely (and quickly!) offer to send them a copy of the print. It's a nice gesture and you might even make a few bucks selling them extra prints. And by the way, if you know this family--tell them there's a free print waiting for them!

Wednesday, January 14, 2009

Get Down to the Jungle Floor

Since most of us stand somewhere between five feet and six-and-a-half feet off the ground, that's the height from which we shoot most of our photos. Easy and convenient, but predictable. You'd be surprised how few people don't bother to kneel down or lay on the ground to shoot a photo--even when the subject (like Sailor the cat) happens to be at ground level.

Getting low works particularly well with children and pets because you're shooting at their eye level, which not only makes the photos more intimate, but makes the subjects feel more engaged with your camera (although to be honest, Sailor was far more engaged with the wild suburban jungle than with me). But getting down low provides an interesting and fresh-looking perspective with almost any subject and really adds nice variety to your photos. Some cameras (like my Canon point-and-shoot) have an articulated LCD screen that makes it easy to see the image even when you're laying flat-out on the ground because you can aim the screen up at a comfortable angle (it's tough to use that peep-hole viewfinder when you're laying on the ground). I love that articulated LCD, by the way, and it's a feature to keep in mind next time you're looking for a new camera.

Get down low, get up high, do whatever it takes to make your photos interesting.

Tuesday, January 13, 2009

Look Back Through Tourism Time

I seem to be in a minority among my friends, but I happen to love Florida and wish I had time to go there more often. One of my favorite things to do when I am traveling there is to haunt the back roads looking for signs of "Old Florida." There is precious little of it left, but finding it is a blast.

Back in the 40's and 50's, when Florida was first being discovered by the rest of the country, it led the world with wild, outlandish (some might say garish) and curious tourist attractions. After all, if you were going to lure tourists down to see alligator wrestling on your gator farm, you might as well stick a giant alligator on your front lawn and make your entrance from a 30' high gator jaw. And if you were going to sell them oranges, why not sell them from an orange-shaped roadside stand? (I found this one near Ocala, by the way.)

As a somewhat sad side note, I recently heard that the famous (and oh so beautifully tacky!) Cypress Gardens has, at long last, been sold and is now a more modern amusement park. Cypress Gardens was the quintessential Old Florida amusement park and was filled with Southern Belles in full belle dress wandering the grounds, water ski shows performed to Elvis' songs and beautiful footpaths decorated with thousands of twinkle lights at dusk. It's gone now and I'm so glad that I went out of my way to visit it while it was still there.

While Florida is probably unique in its volume of old touristy icons, almost every community in this country has some interesting reminders of a more innocent time. Search them out with your camera because they are disappearing fast and once they're gone, they're gone. We'll likely not see a rebirth of giant alligator heads in Florida--and isn't that a shame?

Monday, January 12, 2009

Plant a Butterfly Garden

In yesterday's post I talked about planning your summer garden and as long as we're on that topic, here's another idea: plant a butterfly garden! Butterflies are a great thing to photograph and drawing them to your garden is simple--just plant some of their favorite flowers.

I've had a tremendous success with tithonia (Tithonia roundiflora, or Mexican sunflower, shown here with a Monarch butterfly), a very easy-to-grow annual that grows about 5-6 ft tall and is bright orange. Beautiful! (By the way, there is a relative of tithonia called Bolivian sunflower that reaches up to 16 ft (5 m) tall and is often more than 12 ft (3.6 m) across, that I've never grown but I've read it can be invasive in southern climates, so read more about it before you plant it.) I have also had great luck with buddleia, aka butterfly bush, that is a perennial shrub and attracts butterflies in droves. Others I've had luck with include milkweed, zinnia and (especially in hanging pots) impatients.

There are actually dozens, if not hundreds, of flowers that will attract butterflies and you'll find lots of info on the web. The National Wildlife Federation site has a good basic butterfly primer that talks about both plants and the butterfly's life cycle. And a site called the Milkweed Cafe has a great article about butterfly gardening.

Whatever you plant, remember that insecticides kill both catepillars and butterflies, so don't use them anywhere near your butterfly garden or you'll be killing instead of feeding them! The truth is that I've been gardening since I was a kid and have never used insecticides and never had a problem that I couldn't cure naturally. You don't need insecticides in your garden, you need more insects!

Sunday, January 11, 2009

Plan Your Spring Photography Garden

As I write this, my gardens are covered in snow, the temps are in the low 20s (and expected to go below zero by the end of the week) and spring seems a million miles away. But in reality, the first day of spring is only about 10 weeks away and already my mailbox is filling up with garden catalogs--and they save my life every winter!

I spend a lot of winter nights just daydreaming about what plants I'd like to grow and which would be the most interesting to photograph. The bleeding heart shown here, for example, is an incredibly easy-to-grow shade plant but provides one of the most photogenic flowers you'll ever see. And seedlings of this plant are really cheap (under $5) online. Most seed catalogs list literally thousands of flower (and veggie) seeds and it warms my photographer's soul just to look at all of those interesting colors and shapes.

Now is the time to think about some of the plants you'd like to photograph in the coming spring and summer months and to start hunting down good seed and plant catalogs. You can save a lot of money growing your own plants from seeds (or small seedlings bought online) and during the dead of winter many (if not all) online nurseries have substantial sales. The other benefit of starting from seeds is that you'll have a huge variety of potential plants compared to what you'll find in local garden centers.

To get you started, here are a few of my favorite online nurseries.

Plant Delights (biggest hosta seller in the world, lots of tropicals)

Park Seed Company (very high quality seed)

Burpee (the traditional company, many types of seeds)

Johnny's Seeds (that's a direct link to their free catalog)

Saturday, January 10, 2009

Set Shutter Priority Mode for Action

Almost all digital cameras have a shutter-priority exposure mode these days and it's a great tool if you occasionally (or frequently) shoot action subjects. (And, by the way, if you have three-year-old living in the house, that qualifies as a action subject.) As long as you have a decent amount of light this mode will almost always assure that you get sharp action photos.

The shutter-priority mode is a fully automatic exposure mode and it sets both shutter speed and aperture for you, but it gives priority to selecting the fastest shutter speed available. By setting this mode you're telling the camera that what's most important to you is freezing the action and that depth of field (near-to-far sharpness) is a secondary consideration.

You can also increase your odds of getting good action-stopping photos if you time your shots for the peak of action. To capture this shot of a teenager on a bungee ride at a carnival, for example, I watched him bounce and turn head-over-heels a few times and then, when I thought he'd reached the peak of his jumps, I shot. I worked out a pretty good timing sequence by watching him and was able to get quite a number of sharp photos of him.

Sunday, January 4, 2009

Flood Your Photos

If you're a Photoshop user and your photos have been looking a bit dry lately, you might want to consider the Flood filter from Flaming Pear Software. The filter (it goes in your plug-in file) does just what the name implies: it floods your photo with water.

But why would you want to flood your photos with water?
The answer is it's fun! Yes, filters can be tacky and people do have a tendency to overdo them--but they are also a kick to play around with. I've had a lot of fun putting floods in the desert, under mountians, around people and, here, I submerged the Eiffel Tower.

The filter is super easy to use and there are no instruction manuals to study. The interface is purely graphical (in other words, you just click on little icons and see what happens) and there are lots of simple controls for manipulating where the flood horizon goes, how smooth or rippled the water looks, how bright the reflections will be, etc. The filter is really ingenious and, like I said, it's a heck of a lot of fun to turn to when doing important things like correcting sharpness and fixing dust spots gets too tedious.

You can download the plug-in on a trial basis for free (Windows or Mac) and if you decide you can't live without it, it's just $29 to own it. I have to say it's probably the most fun software I've ever bought for under $30 and, for commercial photographers, it can have a lot of useful and interesting applictations in still life work. I know a food photographer that uses it regularly.

Saturday, January 3, 2009

Give Fog An Extra Stop of Exposure

Fog and mist add a lot of atmosphere to a photograph but they can make it a bit tricky to get the exposure just right. The problem is that both fog and mist reflect a lot of light and they fool the meter into thinking there is more light than there really is, so if you expose at what the meter says, you get an underexposed (dark) photo. The situation is really easy to solve using your exposure-compensation feature. Typically dialing in a setting of +1 stop or even +1.5 stops of exposure will give you a well-exposed fog shot.

If your camera has an automatic exposure bracketing feature you can use that to take a burst of several exposures, each at different settings. You can set the bracketing feature to automatically take a series of three (and, on some cameras, more than three) exposures in user-selectable increments ranging from 1/3 stops to 2 full stops. A typical sequence (in single stop intervals, for example) would be: -1 stop, correct exposure, +1 stop. Then you can choose the best exposure later. Bracketing is a great feature that I use often, but it works best on a tripod where you know you're getting the exact same framing for each shot.

Friday, January 2, 2009

Crop in the Camera

Cropping your images during editing is easy and it's a fast way to get rid of peripheral clutter or to gently recompose a picture. The trouble is that when you crop in editing you're throwing away pixels and therefore shrinking the size of your image. The more you crop, the less image area (number of pixels) you have to work with.

Since I like to make big enlargements and often sell photos to publishers looking for large images, I prefer to do most of my cropping in the camera. By using your zoom lens to crop in camera you can create a variety of views of a subject and yet each one will contain the maximum number of pixels your camera captures. In other words, you'll have the same full-sized image for each different cropping. Just be sure that as you crop (especially if you're using a variable-aperture zoom lens) that you adjust the f/stop to extend the depth of field (near-to-far sharpness) and keep the entire subject in sharp focus. Remember that as you zoom closer the added magnification reduces the depth of field.

Thursday, January 1, 2009

Combine Window Light and Flash Fill

I love the look of window light because it's generally warm (especially early and late in the day) and somewhat diffuse. The problem is that compared to the dim interior of my house there is a major contrast problem. The best way to solve this is either to turn on a few room lights or to pop on the built-in flash. I prefer using flash in this situation only because it's more convenient--I just press a button on my camera and the flash pops up.

The great thing about using flash with window light is that it tends to open up the dark areas adequately (the parts of your subject facing the room) but, because the window light is so strong, doesn't overpower the natural light. My cat likes to sleep on a little bookcase in a sunny window in my office and, because she's a cat, she tends to lay there when the sun is at its brightest (and warmest). Photographed without flash her face would be lost in shadows and I'd lose those pretty colors in her face. With the flash there's a nice sparkle in her eyes and fur and yet the scene looks quite natural.

Turn on the flash when you're working near a window and you'll see that your contrast is less intense and your pictures are much easier to print.